
Barbell Front Squat: Rack Position, Technique, and Common Fixes

Founder
I founded HomieGym to help you make informed decisions about training at home. My background includes university-level sports science education, practical coaching, gym training and combat sports.
The barbell front squat places the bar across the fronts of your shoulders while you squat with a braced trunk and planted feet. Your shoulders support the load; your hands guide it. I make that distinction the first priority, because a bar carried in your wrists becomes difficult to control before your legs have done much work.
Start with a manageable practice bar and a compatible rack with correctly positioned safeties. Learn to unrack, squat and return the bar as one complete task. Once you can repeat that sequence, you can adjust the stance, grip and load without relying on a perfect-looking pose or copying someone else's working weight.
Table of Contents
Set Up the Rack and Position the Bar
Set the hooks so you can stand the bar clear with a small leg extension. Settle the shaft onto your shoulder shelf before lifting it out. The front rack is this shoulder-supported bar position, distinct from the equipment rack that holds the bar before and after the set.
Check the equipment instructions for permitted use, load limits, anchoring and compatible attachments. Both J-cups, the hooks that hold the bar, must be secured at the same height. Choose a height that lets you get both feet under the bar and stand it clear without rising onto your toes or performing a deep squat. Leave a short, unobstructed route from the hooks to your lifting position.
Fit and secure the rack's compatible safety bars or straps according to its instructions. Test their height with a manageable practice bar: they should allow your planned squat depth without contact, yet catch the bar with room for your body to move clear. Hole numbers and heights depend on the actual rack and your body. If the supports cannot meet both conditions, the station needs changing before loaded front squats.
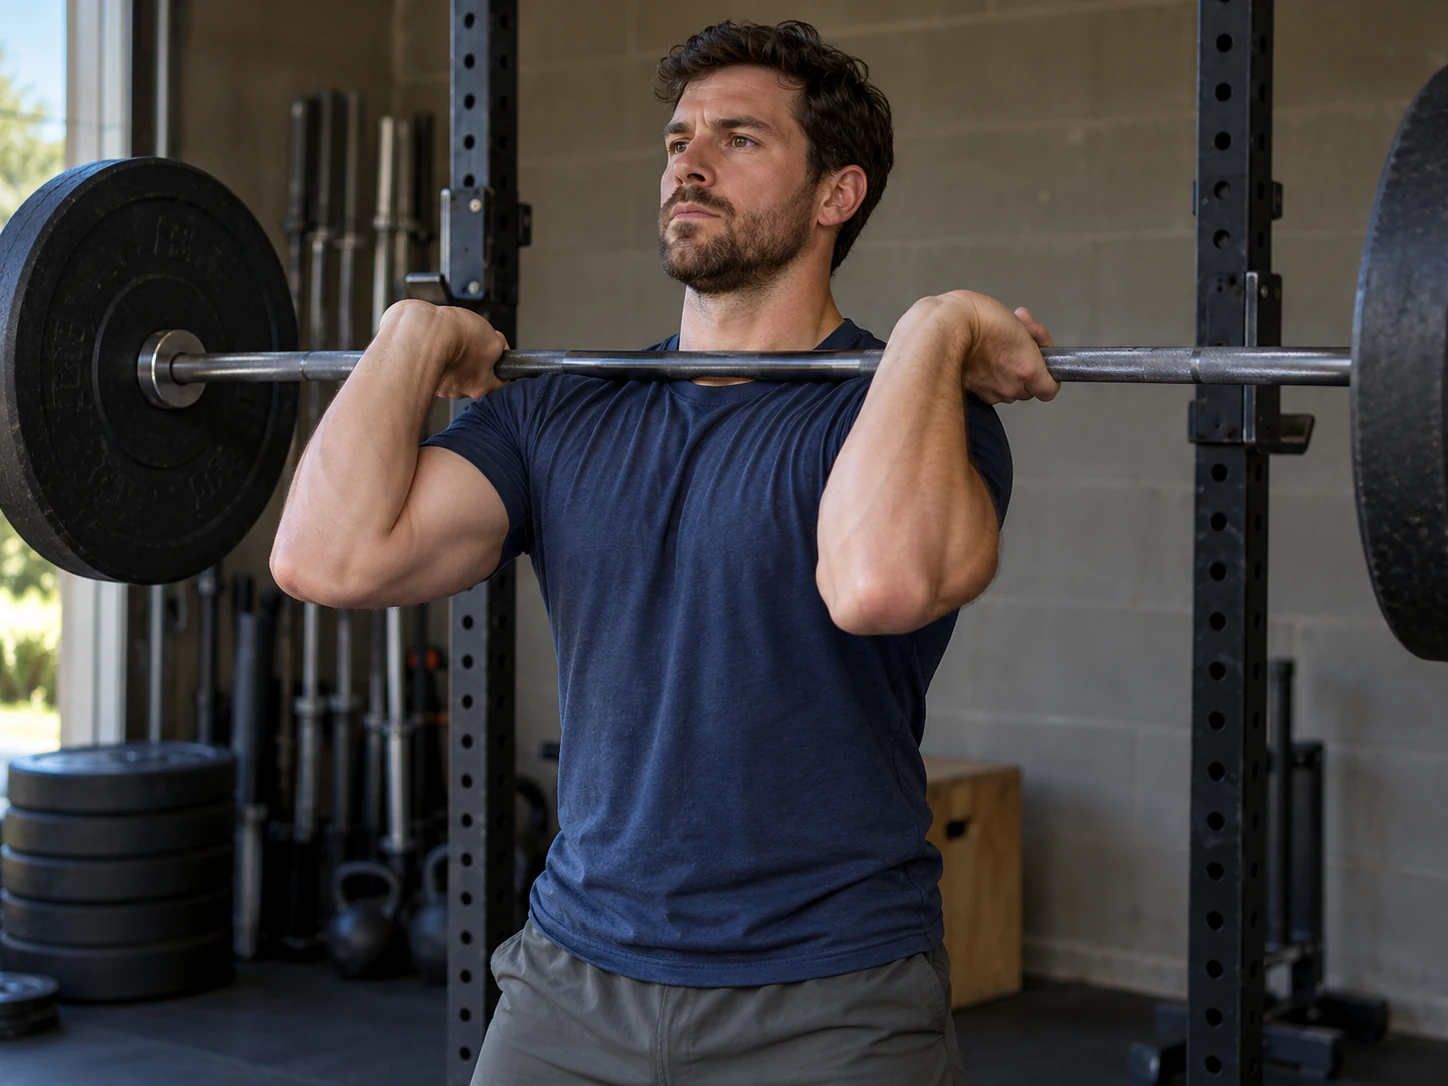
For front squat bar placement, step close to the bar and bring the fronts of your shoulders underneath it. Let the shaft rest across the shoulder shelf near the base of your neck, without forcing it into your throat. Lift your elbows forward enough to keep that shelf under the bar. A stable front squat bar position stays close to your body; it should not require you to curl the weight upward with your hands.
With a clean-style grip, place your hands a little wider than your shoulders and allow a loose fingertip hold as needed to keep the elbows forward. The hands guide the bar while the shoulders bear its weight. Do not force a closed grip or pull the wrists backward to imitate another lifter's position. A cross-arm grip is another option: keep the same shoulder support, cross your arms over the bar and use your hands to steady it. Choose the grip you can maintain comfortably with a light load.
- Practice standing the light bar clear of both cups and taking a short walkout.
- Perform a controlled squat through your intended range and confirm that the safeties do not interrupt it.
- Rehearse lowering the practice bar onto the safeties, letting them support it and moving clear without getting trapped.
- Practice returning the bar to both cups and checking that it is fully supported before releasing it.
How to Do a Barbell Front Squat
Unrack with the bar supported on your shoulders, squat as low as you can control with whole-foot contact, then stand and rerack. Your torso should stay upright enough to keep the bar balanced over your feet, but the exact angle will vary with your proportions, stance and depth.
Unrack and Set Your Stance
With both feet under the bar, settle the shaft onto your shoulders and take a breath. Brace by firming the muscles around your trunk so you can maintain control as you move. Stand to lift the bar clear of both J-cups, then take only the steps you need to reach your rehearsed position within the safeties.
Begin with feet around shoulder width and toes slightly turned out, then adjust during light practice if another stance gives you better control. Settle your balance before descending. Keep contact through your heels and the bases of your big and little toes. You should not need to lift your toes to stay back or rock onto your forefeet to hold the bar. If the bar is already sliding before the first repetition, return it to the hooks and reset.
Brace, Descend and Stand
Refresh your breath and brace at the top. Bend your knees and hips together and lower between your legs with the bar staying close to your body. Let your knees track in the same general direction as your toes. They can travel beyond your toes as you descend; forcing them behind the toes can make it harder to keep the bar balanced.
Use a depth at which you can maintain foot contact, shoulder support and a controlled trunk position. Turn around smoothly without bouncing out of a position you cannot hold. Push through the whole foot to stand, keeping your elbows forward enough that the bar remains on the shoulder shelf. Finish standing, regain your balance and reset your breath before the next repetition. If your position changes substantially as you rise, end the set instead of chasing the remaining repetition target.
Rerack Before Releasing the Bar
After the final repetition, stand steadily and walk toward the hooks along the route you practiced. Guide both ends of the bar over the J-cups, then bend your knees enough to lower the bar into them. Keep your shoulder shelf and hand guidance until both cups support the shaft. Check that the bar is seated before releasing your hands and stepping back.
If you cannot stand from a repetition, lower the bar onto the safeties using the route you rehearsed with the light bar. Let the supports take the weight, release your grip and move clear once the bar is supported and still. Do not attempt an unfamiliar forward dump or twist out under a moving bar. End the session for sharp or increasing pain, numbness, dizziness or lost control. Persistent symptoms need professional assessment rather than repeated loaded experiments.
Fix Dropping Elbows, Heel Lift and Forward Bar Drift
Reduce the load and check the setup when elbows drop, heels lift or the bar drifts forward. Each fault gives you a place to investigate, but it does not diagnose a tight muscle, weak core or injured joint. Change one manageable detail and test it with a practice set.
| What You Notice | What to Try With a Light Bar | When to End the Set |
|---|---|---|
| Elbows drop | Reset shoulder support; loosen or change the grip | Bar starts rolling off the shelf |
| Heels lift | Adjust stance or reduce depth | Whole-foot contact keeps disappearing |
| Bar moves forward | Keep it close; use less weight and a controllable depth | You cannot restore balance |
| Wrists carry the load | Reposition the bar on the shoulders; try cross-arm support | Pain or unstable support persists |
| Bar hits a safety | Rerack and review catch height and planned range | Rack geometry cannot support both tasks |
For dropping elbows, first check whether the bar was supported on your shoulders at the start. Squeezing harder with your hands can make the grip more restrictive. A slightly different hand width or a cross-arm grip may let you keep the shoulder shelf while you practice the squat. If the bar still rolls as fatigue builds, reduce the load or finish earlier.
A side-view recording of a light set can help you see when heel lift or forward drift begins: before the descent, at your deepest point or only during a difficult ascent. I reduce the task to the range you can repeat, then build from there. Do not force extra depth while balancing on the edges of your feet. If repeated adjustments remain uncomfortable or unstable, use another squat variation and seek a qualified assessment.
Start With a Load Your Front Rack Can Support
Start with a load that lets you keep the bar on your shoulders throughout the unrack, squat and return. Your legs may be able to move more weight than your current front rack can support. A light training bar or a manageable nonbarbell squat is a better practice tool when an empty full-size bar already disrupts the position.
A lift-specific starting example is two working sets of 5 to 8 repetitions, with two to three minutes of rest between sets. Working sets are the planned challenging sets after easier practice. Leave about two or three controlled repetitions in reserve, meaning you estimate that you could complete that many more with the same range and technique. Use more margin while learning. The example is an editorial starting point to count within your existing program, rather than a complete session or an optimal prescription for every lifter.
The 2026 American College of Sports Medicine overview supports progressive resistance training for strength and muscle growth in healthy adults. It does not establish a universal front-squat starting weight, and training to momentary failure did not consistently improve outcomes across the included reviews. (1) You can progress without testing a one-repetition maximum or waiting for the bar to fall out of position.
- Record the total bar-plus-plate load and completed repetitions for each working set.
- Keep the load while you build toward eight repetitions with repeatable depth, balance and shoulder support.
- When every working set reaches eight at the intended effort, consider the smallest practical increase.
- Return toward five repetitions after increasing and build again. If the jump is too large, stay with the lighter load.
One poor session does not automatically require a deload, which is a temporary reduction in training demand. Repeated deterioration calls for a review of load, sets, other training and recovery. I count a set that ends because the front rack collapses as a reason to revise the next attempt, even when the legs feel capable of more.
Front Squats and Back Squats: What Changes With Bar Position
Front squats support the bar on the fronts of your shoulders, while back squats support it across the upper back. The front position generally requires a more upright torso to keep the load over your feet. Both train the legs and hips and require trunk control, but the front rack adds a distinct shoulder-support task.
| Decision | Front Squat | Back Squat |
|---|---|---|
| Bar support | Front shoulder shelf | Upper back |
| Position to practice | Elbows forward; shoulders under the bar | Stable upper-back contact and grip |
| Working weight | Choose for this lift | Choose separately for this lift |
| Role in a session | Can occupy the main squat slot | Can occupy the main squat slot |
A 2009 study of 15 trained participants found higher estimated knee compression and knee extensor moments in its back-squat condition. Participants used 70% of each lift's own one-repetition maximum, so the absolute loads differed. That acute comparison cannot separate bar position from every loading difference or establish that front squats prevent injury. (2) It is not a reason to prescribe front squats for a painful knee.
I choose between the lifts by the squat task the program needs and the position the lifter can repeat. If the shoulder shelf is the limiting skill, a manageable dumbbell squat may offer a simpler starting point, although it uses a different hold. There is no requirement to perform both barbell variations in the same session.
When you are ready to place front squats in a complete lower-body routine, use the barbell leg workout guide. A front squat can replace its main squat when your setup and skill support it. Count those sets as the squat work already planned rather than adding them to a second full squat prescription.
FAQs
Can I use a cross-arm grip?
Yes, a cross-arm grip is a valid front-squat option when it lets you support the bar comfortably on your shoulders. It steadies the same shoulder shelf, but it does not practice the hand position used to receive a clean.
Can I front squat without a rack?
Yes, a lifter who can competently clean a manageable bar can reach the front-squat position without a rack, but that requires a separate lifting skill and an appropriate return plan. For learning the squat, use a suitable rack and safeties or a manageable nonbarbell variation.
Should the front squat use the same weight as my back squat?
No, choose your front-squat weight from the load you can support and control in that lift. Back-squat performance does not establish a required front-squat weight or a universal strength ratio.
This guide provides general exercise education for healthy adults, not individualized medical advice or treatment. If an injury or ongoing symptoms affect your training, seek guidance from an appropriate healthcare professional.
References
- Currier BS, D'Souza AC, Fiatarone Singh MA, et al. American College of Sports Medicine position stand. Resistance training prescription for muscle function, hypertrophy, and physical performance in healthy adults: an overview of reviews. Med Sci Sports Exerc. 2026;58(4):851-872. doi:10.1249/MSS.0000000000003897
- Gullett JC, Tillman MD, Gutierrez GM, Chow JW. A biomechanical comparison of back and front squats in healthy trained individuals. J Strength Cond Res. 2009;23(1):284-292. doi:10.1519/JSC.0b013e31818546bb